


HOW TO FORGE A TRADITIONAL SAMURAI SWORD (KATANA)
Forging a traditional samurai sword, or katana, was never considered a purely mechanical process. In medieval Japan, sword-making was both a technical discipline and a spiritual practice, shaped by ritual, metallurgy, and generations of refined craftsmanship.
In the Japanese Middle Ages, forging a katana was not merely a technical process but a deeply spiritual practice. Ancient blacksmiths believed that creating a new sword involved invoking benevolent spirits to bless the blade. Before beginning the forging process, the swordsmith would perform purification rituals, chanting prayers to cleanse the workshop and prepare for the sacred task ahead. These ceremonies were believed to ensure that the resulting katana would embody the samurai spirit and become a symbol of honor and courage.
The Tatara: Crafting the Heart of the Steel
The journey of creating a katana begins with building a unique type of furnace called a Tatara. This traditional smelting furnace, resembling a rudimentary clay blast furnace, is specially constructed to produce the raw material needed for the blade.
The Tatara is fueled with charcoal and iron sand, and the smelting process traditionally lasts for three days and three nights. During this time, the charcoal and iron sand are continuously fed into the furnace, maintaining the intense heat necessary to create steel.
Ancient Japanese swordsmiths faced a major challenge: the quality of the raw material. Unlike the richer iron ore deposits found elsewhere, Japanese iron sand was often lower in purity. This made the smelting process especially demanding, requiring precise control of temperature and airflow to remove impurities and produce high-quality steel.
Tamahagane: The Jewel of Steel
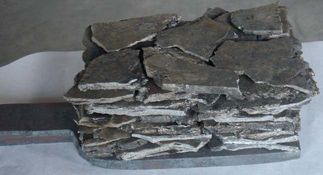
The primary product of the Tatara is Tamahagane, often translated as “steel jewel”. This material is the foundation of the traditional katana. It is characterized by a porous structure and a unique balance of iron and carbon.
Even after smelting, Tamahagane still contains impurities and irregularities. The first result is a brittle and uneven block of steel, which must be broken down and refined before it can be forged into a blade.
The raw Tamahagane is therefore broken into smaller pieces and sorted according to hardness and carbon content. The swordsmith selects the most suitable fragments for the blade, while other portions are modified or used in less critical structural areas.
Refining the Steel: Purity Through Folding
Once the best Tamahagane fragments have been selected, the refining process begins. The steel is heated until red-hot and then hammered repeatedly to eliminate impurities. During this stage, the material is folded and hammered many times — often between 10 and 15 folds — creating thousands of layers.
This folding process serves two essential purposes: it helps even out the carbon distribution throughout the steel and improves the blade’s resilience and consistency. It also gives rise to the characteristic Hada, the visible grain pattern that distinguishes a traditionally forged Japanese blade.
Crafting the Core and Outer Layer
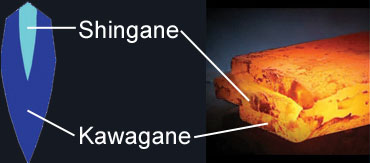
A true katana is valued for its dual steel construction: a hard outer layer for edge retention and a softer inner core for flexibility. To achieve this, the swordsmith carefully combines Kawagane (outer steel) and Shingane (core steel).
The outer layer is made from high-carbon steel and forms the cutting section of the blade, while the core is made from lower-carbon steel to absorb shock and reduce brittleness. This combination allows the katana to be both sharp and durable.
The layered steels are then heated, folded, and hammered again so they can weld together as a unified structure.
Symbolism and Mastery
Creating a katana is not only a mechanical process, but also an artistic and spiritual endeavor. The traditional forging methods have been passed down through generations of smiths, each preserving ancient knowledge while refining technique. The final blade is not simply a weapon, but a symbol of dedication, patience, discipline, and the samurai code of honor.

Fragmentation and Selection of Tamahagane
Once the raw Tamahagane steel has been produced through the smelting process in the Tatara furnace, it still contains varying levels of carbon and impurities. To optimize the steel for forging a katana, the next essential step is fragmentation and selection.
Fragmentation and Sorting
The solid block of Tamahagane is carefully broken into small cubes. These fragments are then examined one by one, with each piece evaluated according to its purity, texture, and carbon content.
An experienced swordsmith can identify the quality of each fragment by observing its color and structure. Pieces with a darker, more uniform appearance generally indicate higher carbon content and are more suitable for the hard outer layer of the blade (Kawagane). Lighter and softer fragments with lower carbon are more appropriate for the flexible inner core (Shingane).
Heating and Hammering: Transforming Cubes into Sheets
After sorting, the selected Tamahagane cubes are heated to a red-hot temperature. At this point, the steel becomes malleable enough to be hammered into thin sheets. This stage demands precision, because the hammering must remain consistent in order to produce even, flat layers for the next steps.
The blacksmith constantly checks the thickness and texture of these sheets, ensuring that the harder material will be suitable for the blade’s exterior while the more flexible steel remains available for the core.
Layering and Fusion
Once the Tamahagane sheets are ready, they are layered strategically to form the basis of the katana’s internal and external structure. The harder, carbon-rich sheets are placed on the outside, while the more pliable, lower-carbon steel is positioned toward the center.
These stacked layers are then heated again and hammered together to fuse into a single billet. This phase is fundamental, because it not only binds the layers together but also promotes a more even distribution of carbon throughout the steel.
Forging the Billet
Once fused, the billet undergoes repeated folding and hammering. Each fold doubles the number of layers, producing a structure of thousands of microscopic layers. This process contributes both to the durability of the blade and to the formation of the distinctive Hada.
Precision and Skill
The refining of Tamahagane requires a keen eye and exact technique. The swordsmith must preserve the ideal balance between hardness and flexibility. Improper temperature control or uneven hammering can lead to brittleness, weak points, or a compromised final blade.
Repeated Heating, Folding, and Hammering
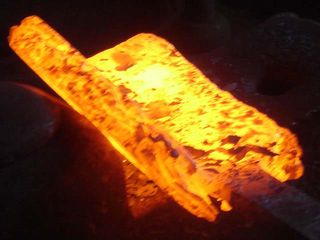
The process of forging a traditional samurai katana is an intricate and labor-intensive art. One of its most important phases is the repeated heating and hammering of the steel, a cycle that purifies the metal, strengthens its structure, and prepares it for final shaping.
Repeated Heating and Hammering: The Foundation of Strength
The raw Tamahagane steel, previously smelted in the Tatara, is heated until it becomes red-hot and malleable. The blacksmith then hammers it repeatedly, flattening and straightening the block while forcing out impurities.
This process is repeated many times. In each cycle, the steel is heated to a glowing temperature and hammered flat again. Gradually, the metal becomes more homogeneous, resilient, and structurally consistent.

The Folding Process: Creating the Layered Structure
Once the steel block reaches the proper consistency, the swordsmith prepares to fold the steel. After reheating the billet, a precise incision is made at its midpoint, and the steel is folded in half. This action doubles the number of layers.
The billet is then reheated and hammered again until it returns to its original working dimensions. This sequence — heating, folding, and hammering — is repeated approximately six to ten times. With each fold, the structure becomes increasingly refined, eventually producing thousands of micro-layers.
Purifying the Steel: Expelling Impurities Through Repetition
With each fold, the carbon content becomes more evenly distributed, helping reduce brittleness while improving flexibility. At the same time, repeated exposure to intense heat risks carbon loss, so the blacksmith must carefully balance the process to preserve hardness.
The continuous folding and hammering also push slag and impurities toward the surface, where they can be removed. This refining phase is essential to the durability and cutting performance of the finished blade.
Assembling the Core: Creating the Shingane
After the main forging and folding stages, the steel plank is cut into several sections and fused again to create the basis of the sword structure. The next major step is preparing the Shingane, the softer core steel.
The Shingane is made from lower-carbon steel and is folded and hammered repeatedly in order to achieve the desired softness and shock absorption.
Combining the Core and Outer Layers
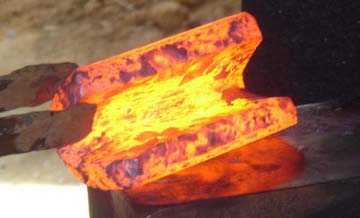
Once the Shingane is prepared, the outer steel, or Kawagane, is shaped into a U-form to receive the core. The Shingane is inserted inside, and the entire assembly is heated and hammered until the two parts weld together.
This phase is particularly delicate. The swordsmith must ensure that the Kawagane remains on the outside, while the Shingane stays properly enclosed within. Any flaw in this structure could compromise the blade’s integrity.
Precision Welding and Preliminary Blade Shaping
The welded billet is then drawn out and shaped into a preliminary blade form. During this phase, the steel is elongated while the correct cross-sectional geometry is maintained. The swordsmith begins to form the blade’s length and proportions, preparing it for the later stages of hardening and finishing.
The Molecular Precision of Layering
Through repeated folding, the steel develops thousands of ultra-thin layers. This microscopic structure contributes to the katana’s famous combination of sharpness, toughness, and flexibility. The final result is a blade that remains hard at the edge and more resilient in the core.
The Final Fusion
Before tempering, the blade is heated and hammered again to finalize the bond between the internal and external layers. At this point, the swordsmith ensures that the shape, alignment, and structure are correct before moving on to hardening.
Advanced Techniques in Katana Forging
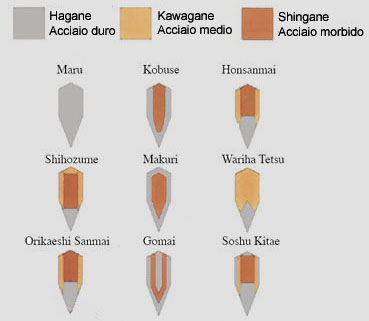
The forging of a traditional samurai katana requires not only technical skill but also deep metallurgical knowledge. While the most straightforward approach uses Kawagane to balance hardness and flexibility, more advanced methods incorporate Hagane and other steels to improve edge performance and durability.
The Complexity of Using Hagane
Unlike the more pliable Kawagane, Hagane is a higher-carbon steel. This makes it harder and more resistant to wear, but also more brittle if not treated properly. For this reason, Hagane is usually combined with softer steels rather than used alone.
Layering Multiple Steel Types
To achieve the ideal balance, traditional swordsmiths layered Hagane, Shingane, and Kawagane. Hagane forms the cutting edge, Shingane remains the shock-absorbing core, and Kawagane often protects the outer sides of the blade.
This type of structure appears in forging methods such as Sanmai and Kobuse, where the combination of hard and soft steels creates a blade that is both sharp and resistant to breakage.
The Role of Legendary Swordsmiths
Historical masters such as Masamune are often celebrated for pushing these techniques to extraordinary levels. Tradition holds that Masamune could incorporate multiple steel types within a single blade, creating swords renowned for their sharpness, resilience, and beauty.
The Importance of the Kissaki
One of the most delicate and technically demanding parts of the forging process is the creation of the Kissaki, the sword tip. Because the tip must remain both sharp and durable, it is often reinforced using Hagane.
The Kissaki is not a simple point, but a complex geometry that must transition smoothly from the rest of the blade. Crafting it requires precise control of temperature, shaping, and hammering technique.
Differential Hardening
Another fundamental stage in advanced katana forging is differential hardening. Before quenching, the blade is coated with a clay slurry, with a thicker layer on the spine and a thinner layer on the edge. This causes the edge to cool faster than the back of the blade.
The result is a hard cutting edge with a softer, more flexible spine. This process produces the famous Hamon, the visible temper line that marks the transition between the two structures.
Advanced Layering Techniques: Shihozume and Orikata
In addition to Sanmai and Kobuse, some swordsmiths used even more complex techniques:
- Shihozume: the softer core is almost completely enclosed in harder steel, offering strong protection and durability.
- Orikata: a folding approach that creates a more complex internal structure to improve shock absorption while preserving edge performance.
These advanced techniques require extremely precise control over temperature, hammering force, and layer positioning. Even a small mistake can create hidden weaknesses in the finished blade.
Modern Interpretations
Today, modern swordsmiths often continue drawing inspiration from these ancient methods while combining them with more consistent metallurgical controls. Even when modern methods are used, the principles of balance, hardening, resilience, and edge performance remain directly rooted in traditional katana craftsmanship.
The Crucial Stage of Tempering
One of the most critical phases in crafting a traditional samurai katana is the tempering process. This stage gives the blade its combination of hardness, cutting power, and flexibility. If performed incorrectly, even a beautifully forged blade can be ruined.
Shaping the Blade Before Tempering
Before hardening begins, the blade undergoes final shaping. At this stage, the swordsmith refines the Nakago (tang) and the Kissaki (tip), while also adjusting the edge line and overall proportions.
Once this shaping is complete, the blade is heated again and then allowed to cool in a controlled way, preparing it for the actual hardening phase.
Tempering: The Most Critical Moment
Tempering involves rapidly cooling the heated blade to fix its molecular structure. The blade is brought to a red-hot temperature and then quenched in water or oil. This sudden cooling hardens the steel, but also introduces significant risk.
Water vs. Oil Quenching
- Water Quenching: usually used for higher-carbon steel; produces a very hard and sharp edge, but carries a higher risk of cracking.
- Oil Quenching: cools the blade more gradually, reducing the risk of cracks but generally producing a slightly softer edge.
- Mixed Quenching: some methods combine oil and water to balance hardness and flexibility.
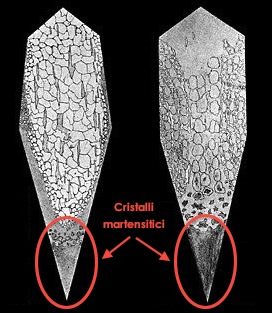
During this phase, the steel’s molecular structure changes dramatically. The rapid cooling traps carbon within the iron matrix, creating a martensitic structure in the edge, which is responsible for the katana’s hardness.
Understanding Carbon’s Role
Carbon is essential in determining the hardness and resilience of the blade. If cooling occurs too slowly, the steel remains too soft. If it occurs too quickly or too unevenly, the blade may become excessively brittle. The swordsmith must therefore control cooling with extraordinary precision.
The Dangers of Incorrect Tempering
Improper tempering can cause several serious defects:
- Cracking: caused by excessive thermal stress.
- Warping: uneven cooling may bend or distort the blade.
- Softness: cooling too slowly may reduce sharpness and rigidity.
- Loss of Curvature: the sori may become altered during quenching.
In some cases, the blade may also develop microscopic fractures that are not visible immediately but compromise the sword during later use.
Secondary Tempering
To reduce stress created during the initial quench, the blade undergoes a second tempering stage. In this phase, it is reheated to a lower temperature so that internal tension can relax. This process helps stabilize the structure and prepares the blade for polishing.
The Role of the Hamon
The Hamon is a visible line along the blade that marks the transition between the hardened cutting edge and the softer spine. It is created through the differential hardening process and is both a functional feature and an important artistic element.
- Formation: a thicker clay layer is applied to the spine, while a thinner layer is applied to the edge.
- Aesthetic Patterns: traditional forms include Suguha, Gunome, Choji, and Notare.
- Functional Purpose: the Hamon reflects the distribution of hardness and flexibility within the blade.
Final Adjustments and Inspection
After tempering, the blade is carefully inspected. The swordsmith examines the curvature, hardness, edge alignment, and structural integrity. If the blade passes this stage successfully, it can move on to polishing, where the Hamon and Hada become much more visible.
Maintenance After Tempering
Proper maintenance is essential after hardening:
- Regular oiling to prevent rust and oxidation.
- Proper storage in a dry and stable environment.
- Routine inspection to detect signs of warping or stress.
The Hamon: Symbol of Craftsmanship and Functionality
The Hamon is one of the most distinctive and revered features of a traditional samurai katana. More than a decorative line, it represents the interaction of heat treatment, steel structure, and swordsmithing skill. Formed during the Yaki-Ire tempering process, the Hamon reflects both technical mastery and artistic expression.
The Formation of the Hamon
The Hamon begins during the Yaki-Ire process, after the blade has been fully forged and shaped. The swordsmith heats the blade to a glowing red and then prepares it for differential hardening.
Clay Application: The Secret of Differential Hardening
Before quenching, a carefully prepared clay mixture — usually composed of clay, charcoal, ash, and mineral additives — is applied to the blade.
- Thicker clay on the spine: slows cooling and keeps the spine softer and more flexible.
- Thinner clay on the edge: allows rapid cooling, producing a hard martensitic cutting edge.
- Artistic application: the way the clay is applied influences the final Hamon pattern.
After reheating, the blade is quenched. The different cooling speeds create the hard edge and softer spine that define the katana’s functional balance.
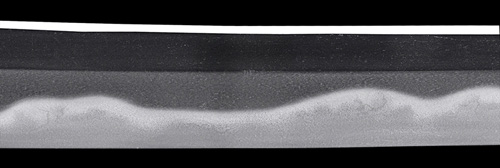
Hamon Patterns: Aesthetic and Functional Significance
The Hamon’s appearance can vary greatly depending on the school of the swordsmith, the steel, the quenching method, and the intended use of the sword.
1. Suguha (Straight Hamon)
- A simple, straight line along the blade.
- Associated with refined simplicity and early sword traditions.
- Provides a consistent cutting edge suitable for controlled martial practice.
2. Gunome (Wavy Hamon)
- A wave-like pattern with repeating rounded shapes.
- Balances hardness and flexibility effectively.
- Often appreciated on practical martial arts blades.
3. Choji (Clove-Shaped Hamon)
- Resembles a sequence of rounded clove-like forms.
- Highly decorative and technically demanding.
- Often reflects a high level of artistic control by the swordsmith.
4. Notare (Undulating Hamon)
- Characterized by gentle rolling waves.
- Includes larger and smaller undulations.
- Combines elegance with an organic visual flow.
5. Midare (Irregular Hamon)
- An irregular or mixed pattern that can combine several shapes.
- Expresses individuality and variation.
- Often admired for its complexity and uniqueness.
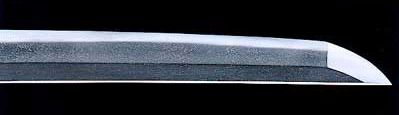
Figure 1 – HAMON SUGUHA

Figure 2 – HAMON GUNOME
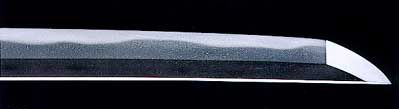
Figure 3 – HAMON NOTARE
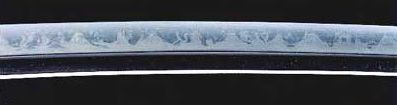
Figure 4 – HAMON CHOJI
Utsuri: The Shadow Hamon
In some high-quality blades, a faint secondary reflection known as Utsuri may appear between the Hamon and the body of the blade. This subtle, shadow-like phenomenon is caused by differences in steel structure and hardening.
- Formation: linked to tempering and internal layering.
- Symbol of quality: often associated with fine antique blades and excellent craftsmanship.
Polishing the Hamon
The Hamon is not fully visible immediately after hardening. It emerges during the polishing stage, when specialist polishers use a sequence of stones to reveal the blade’s true surface.
- Stone types: final polishing uses stones such as Jizuya and Hazuya.
- Mirror finish: the Hamon should become bright and clearly defined.
- Maintaining the edge: polishing must reveal the structure without damaging the hardened martensitic zone.
Why the Hamon Matters
For collectors and martial artists alike, the Hamon is not simply decoration. It is a visible sign of the swordsmith’s ability to control heat, clay, carbon, cooling, and steel structure.
A well-formed Hamon indicates a high-quality katana, combining functional integrity with visual elegance. It remains one of the clearest expressions of the balance between art and performance in Japanese sword-making.
At YariNoHanzo, our katana showcase refined and authentic Hamon styles inspired by traditional techniques and by the long heritage of Japanese craftsmanship.